Qbo I Paid My 940 and Under Task It Say to Pay It Again but Nothing Happens

Utilise the QuickBooks Online integration with HubSpot to create invoices directly from the bargain record in HubSpot, view invoice data, and see payment events on the deal timeline.

Install the integration

  • In your HubSpot business relationship, click the Marketplace icon marketplace in the main navigation bar, and so select App Market.
  • Use the search bar to locate and select the QuickBooks Online integration.
  • In the upper correct, click Install app.
  • One time the integration is successfully connected information technology will be listed in your Connected Apps department.
  • You can connect multiple accounts past navigating to the arketpla Marketplace icon market  in the principal navigation bar. Under Manage , select Connected apps .
  • Select QuickBooks Online, and clickConnect QuickBooks business relationship in the upper right. You tin also disconnect your business relationship past selectingDisconnect.

Using the integration
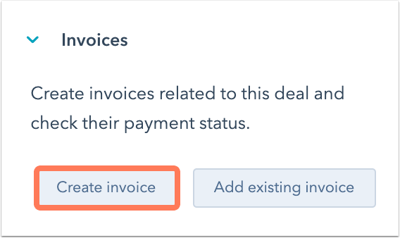
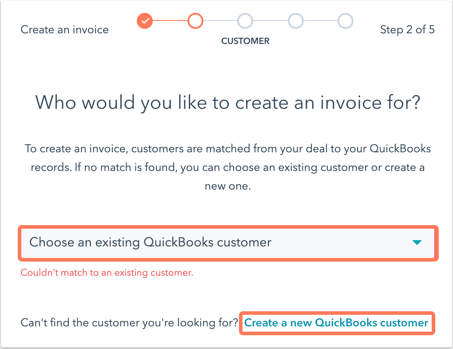
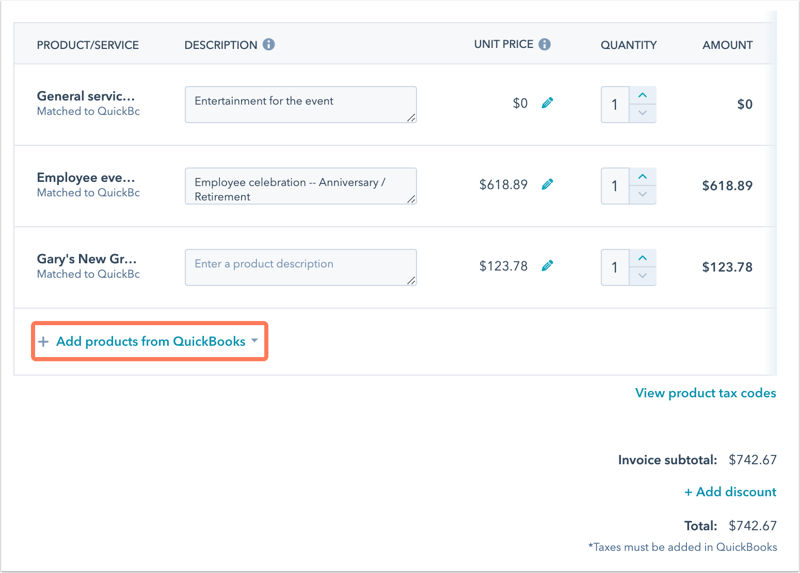
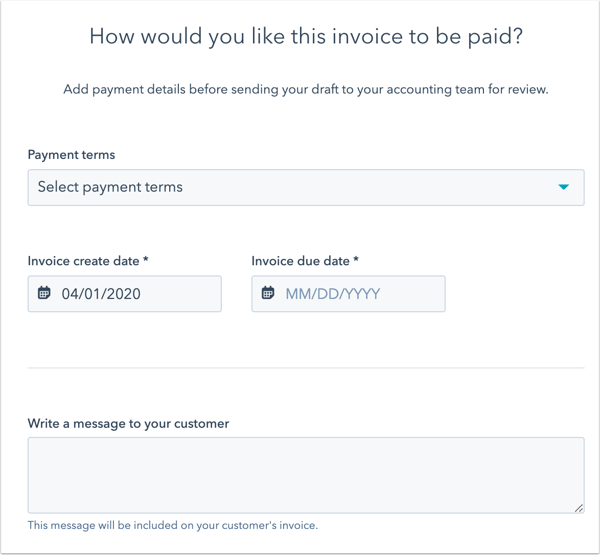
Use the QuickBooks Online integration to create invoices from your bargain record, view invoice information and status, and see payment events on the deal record timeline.

Please note:

  • If an invoice in QuickBooks is in a dissimilar currency than the HubSpot business relationship's company currency, HubSpot volition non sync the invoice data from Quickbooks to the deal properties.
  • Just invoices created in HubSpot will be automatically visible in your HubSpot account. To view invoices created in your Quickbooks account, they must be added to HubSpot.

Create invoices

  • In your HubSpot account, navigate to Sales > Deals.
  • Click the name a bargain record.
  • In the right panel, in the Invoices section, click Create Invoice.
create-invoice-quickbooks
  • If you have multiple accounts, select a QuickBooks account from the dropdown, and click Next.
  • Select if you lot desire to create your invoice from an existing quote or Create from scratch.
    • If you select Create from quote, HubSpot will try to match your quote details to your QuickBook records. If no matching customer can exist found, you can select a customer from the dropdown or click create a new Quickbooks client.

Please note: merely quotes that accept been published and haven't expired can be used to create invoices.

    • If you select Create from scratch, HubSpot volition try to match your deal details to your QuickBook records. If no matching customer tin be found, you can select a client from the dropdown or click create a new Quickbooks customer.
  • Click Adjacent.
select-customer-quickbooks
  • Click Add products from QuickBooks to select existing products from QuickBooks to add together to your invoice. Once y'all have added your products, click Next.
add-products-quickbooks

Delight annotation:

  • For not-U.s.a. QuickBook accounts, tax codes are required for every line particular when creating an invoice.
  • For US QuickBook accounts, revenue enhancement codes do not need to be sent as QuickBooks will add information technology on their end.
  • Select the Payment terms , Invoice create date and Invoice due appointment for your invoice.
  • In the Write a bulletin to your customer section, write the text that volition appear on your customer's invoice, and so click Next.
invoice-payment-quickbooks
  • Review your invoice details. Click Previous to go dorsum and edit your invoice details.
  • To create your invoice in QuickBooks, click Create draft invoice.
  • Click the proper noun of the invoice in the Invoices department to view a preview of your invoice.
  • Your invoice is now prepare to exist sent from your Quickbooks account.

In one case your invoice has been created, it volition exist tagged with ane of the beneath stages:

  • Waiting to be sent: the invoice has not been sent to the customer.
  • Sent to customer: the invoice has been sent to the customer.
  • Partial payment: the invoice has been partially paid.
  • Paid in full: the invoice has been paid in full.
  • Overdue: the invoice is by its payment date and is now overdue.

The following properties will be updated when an invoice is associated with a bargain via the Quickbooks integration:

  • Invoice amount billed
  • Invoice recipient
  • Invoice number
  • Invoice condition
  • Invoice due date

Please note:

  • HubSpot cannot create an invoice in QuickBooks if Client transaction numbers are enabled in QuickBooks. This must be turned off for HubSpot to create invoices in QuickBooks
  • Only invoices created in HubSpot will be automatically visible in your HubSpot account. To view invoices created in your Quickbooks account, they must be added to HubSpot.
  • HubSpot cannot create an invoice in QuickBooks if Customer transaction numbers are enabled in QuickBooks. This must be turned off for HubSpot to create invoices in QuickBooks

Add an existing invoice

Trigger workflows and create custom reports

When the QuickBooks Online integration is installed, you can create workflows using the new invoice bargain properties listed beneath. For example, create a workflow that sends a follow-upward email to customers who take not paid their invoice by their due date. Or, build a workflow that sends a Slack message to your team each fourth dimension you collect a payment.

New deal properties include:

  • Invoice corporeality billed
  • Invoice recipient
  • Invoice number
  • Invoice status
  • Invoice due date

Utilise the new invoice deal properties to create custom reports so you accept total visibility into the income your team is generating for the business concern.

Please note: when syncing multiple invoices to HubSpot to the same deal record, the backdrop above will exist updated by the most recently updated invoice in Quickbooks.

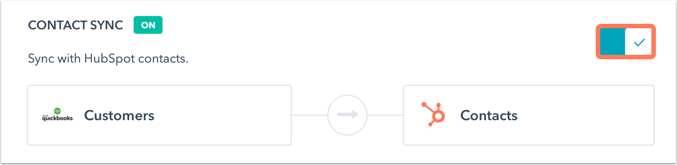
Plough on contact sync

  • In your HubSpot business relationship, click the settings settings icon in the main navigation bar.
  •  In the left panel, navigate to Integrations > Continued apps, and so click Quickbooks Online.
  • Click the Contacts tab.
  • To sync Quickbooks customers with your HubSpot contacts, click to toggle the switch on.

quickbooks-contact-sync

  • In the Creating and updating contacts section, utilize the dropdown menu to determine what happens when associated contacts are created or updated in Quickbooks.
  • In the Deleting contacts section, apply the dropdown menu to determine what happens when associated contacts are deleted in Quickbooks.

Delight note: only newly created contacts will sync to HubSpot.


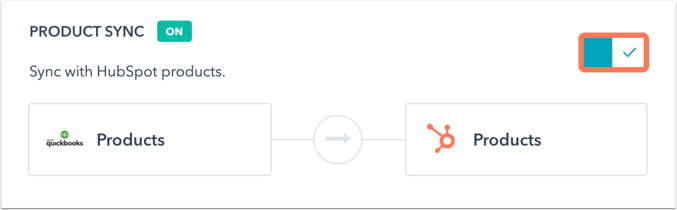
Plow on product sync

  • In your HubSpot account, click the settings settings icon in the principal navigation bar.
  •  In the left console, navigate to Integrations > Connected apps, then click Quickbooks Online.
  • Click the Products tab.
  • To sync Quickbooks products with your HubSpot products, click to toggle the switch on.
quickbooks-product-sync
  • In the Creating and updating products section, use the dropdown menu to decide what happens when associated records are created or updated in Quickbooks.
  • In the Deleting products department, use the dropdown carte du jour to decide what happens when associated records are deleted in Quickbooks.

Delight notation: only newly created products will sync to HubSpot.

  • Navigate to the Product property mappings tab to view the condition of the properties syncing between Quickbooks and HubSpot.

Edit field mappings

  • In your HubSpot business relationship, click the settings settings icon in the main navigation bar.
  • In the left panel, navigate toIntegrations >Connected apps, and then clickQuickbooks Online.
  • Click either theContacts orProducts tab.
  • ClickContact field mappings orProduct field mappings to view the mappings between properties in HubSpot and fields in Quickbooks Online.
  • To add a new field mapping, clickAdd new mapping.
  • Click the dropdown menus to select the HubSpot property and Quickbooks Online field that you want to map to each other.
  • ClickSave.
  • To edit a field mapping, clickActions adjacent to the mapping and click Edit.
  • To delete a field mapping, click Actions adjacent to the mapping and click Delete.

Use QuickBooks advance features

If you have integrated your QuickBook advance business relationship to HubSpot you can too send your invoice directly to the QuickBooks task manager, create QuickBooks workflows and access additional reporting.

Send invoices to the Quickbooks task director

When a user creates an invoice and sends it to QuickBooks advance,  the data from the quote or deal will be sent to the QuickBooks task manager. To access the chore director in your Quickbooks account:

  • Login to your Quickbooks Online account.
  • In the left panel, click HubSpot.
  • In the To Do department, click View tasks.
quickbooks- task-manager

Hither y'all can approve draft invoices or create new tasks.

Gear up upward workflows in QuickBooks to automate tasks

In the Task manager section, you can set workflows to automatically create tasks when an activity needs to be completed. In that location are four standard workflows to choose from:

  1. Payment due reminder
  2. Pay vendor reminder
  3. Banking concern deposits reminder
  4. Unsent invoices reminder

You can customize your workflows in your QuickBooks Online account before turning them on.

Acquire more about connecting HubSpot and Quickbooks Online Advanced.

Sync invoices from QuickBooks to HubSpot (BETA)

To gear up a one-way sync of invoices from QuickBooks to HubSpot:

  • In your HubSpot account, click the settings settings icon in the principal navigation bar.
  •  In the left panel, navigate to Integrations > Continued apps, then click Quickbooks Online.
  • Click the Invoices tab.
  • To sync Quickbooks invoices with your HubSpot invoices, click to toggle the switch on.

quickbooks-invoices

  • In the Creating and updating invoices department, use the dropdown menu to make up one's mind what happens in HubSpot when invoices are created or updated in Quickbooks.
  • In the Deleting invoice section, utilise the dropdown card to decide what happens when invoices are deleted in Quickbooks.
  • Navigate to the Invoice field mappings tab to view the status of the properties syncing between Quickbooks and HubSpot.

View the invoice object (BETA)

Invoices synced or manually added to HubSpot from QuickBooks can be viewed in HubSpot's invoice object. Y'all can also create custom invoice object properties. To view the invoice object:

  • In your HubSpot account, navigate to Contacts > Contacts.
  • In the upper left, click Contacts. In the dropdown menu, select Invoices. This volition bring you to your invoice index page.

To create custom invoice object properties:

  • In your HubSpot account, click the settings settings icon in the main navigation bar.
  • Click Backdrop.
  • Click the Select an object dropdown menu and select Invoice backdrop.
  • Then, create your properties.

The invoice object can be used to segment contacts, trigger workflows, and create custom reports.

Integrations

hueybuttleace.blogspot.com

Source: https://knowledge.hubspot.com/integrations/use-hubspots-integration-with-quickbooks

0 Response to "Qbo I Paid My 940 and Under Task It Say to Pay It Again but Nothing Happens"

Post a Comment

Iklan Atas Artikel

Iklan Tengah Artikel 1

Iklan Tengah Artikel 2

Iklan Bawah Artikel